by Noel Kelsch, RDHAP
[email protected]
Sometimes, the simplest questions require the most complex answers. At a recent infection control seminar, I was asked, “How do I use those self–adhesive sterilization pouches properly?” The answer may surprise you; it could take an entire course to answer that question. Understanding the steps and background involved in using these simple, convenient products can mean the difference between effective sterilization practices and putting patients at risk.
Materials
• The pouch itself — Sterilization pouches are really a medical device and have to be approved by the Food and Drug Administration (FDA). They can be made from a variety of materials including paper, nylon, and plastic. These materials are specifically designed to allow penetration of chemicals, heat, vapor, or steam. As the material cools, it creates a sealed and sterile environment for storage.
• Adhesive strip — The idea behind the adhesion is to create a seal after the material has expanded and contracted. A properly designed pouch allows for the 50% coverage of paper and 50% coverage of plastic with the adhesive. An adequate width of adhesive material with a clean perforated fold allows for a clean, uniform fold and seal, which assures safe storage of the sterilized item.1
Here are some helpful hints about materials.
- Do not reuse bags! The material that the bags are made from was developed to expand when exposed to the heat, moisture, and chemicals. This allows the heat and chemical to enter the bag. As it cools down, it shrinks and seals the contents from the outside atmosphere. The material was made to do this only once. Reusing bags is risking your patients' health as the material will not expand and shrink again, and there is no guarantee that sterilization has been achieved or maintained.2
- Each sterilizer has specific materials that are appropriate for use in it. It is important to check the directions for your sterilizer before choosing a material.3, 4
- To check if your pouch is achieving a proper seal, simply do a water test. Seal the pouch with nothing inside. Open the opposite end of the seal and add water halfway up. If it is leaking, it has not been sealed properly or the seal material is inadequate.1
- You cannot use a tray cover, a paper towel, or any other unapproved product as a substitute.1
• Indicator — Both external and internal indicators are now required by the Centers for Disease Control and Prevention.5 Having one on the outside makes it simple to see if the item has been processed; having one on the inside assures that the process reached inside the bag. Many companies now make bags that have the indicator built in internally as well as externally, or you can purchase a separate multi–parameter indicator to insert into the bag.6
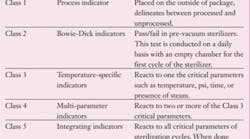
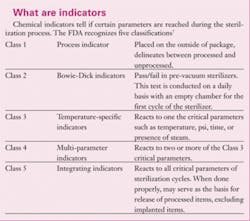
See the related chart for more information about indicators. In addition, here are some hints about indicators:
- Some companies have built–in internal chemical indicators. Be sure to ask if they are multi–parameter indicators (Class 3, 4, 5). They are a great addition and simplify the process.
- When you are purchasing a pouch, ask if the product has multi–parameter indicators (Class 4 or 5) or if they simply turn color when exposed to heat alone (Class 1 or 3).
- By purchasing an internal/external indicator pouch, you will not have to avoid the added expense of buying a separate indicator strip, which often costs as much as the pouch itself!
- To test if your pouch with both internal/external indicator is a Class 3 indicator (only reacting to one of the critical parameters), simply place a bag on top of your sterilizer and leave it there for the day while running the cycle, or place it on the dashboard of your car on a hot day. If both of the indicators change color, the indicator is a Class 3 indicator.
Loading the bag
Write the date and time, or load number, on the outside of the pouch, with a lead–free pencil or nontoxic indelible ink pen.8 This will allow you to pull the load easily if you receive a failed load report. Record the load type, date, and number in your sterilization notebook.4
Fold adhesive on the perforated line with the protective strip still in place. It is vital to fold on this line. This line will direct the placement of the adhesion material when you remove the protective strip. If this line is not folded correctly you will not form a seal and the instruments will be exposed to the atmosphere. Date and record the bag and process load.
While wearing utility gloves, load the pouch while being sure not to overfill the bag. Remove strip from adhesive, re–fold at perforated line to form a tight seal.
Here are some other helpful hints:
- Some companies now have great systems that allow you to see the product size by the color of the box that it is stored in. Buy a variety of sizes to meet the size needs of your practice.
- Do not overfill the bag. This can cause problems with perforation, placement of seal, and tearing of material.2
- Allow the load to dry completely before removing from sterilizer. By removing the pouch before it has completely dried, you are risking contamination. Wicking can occur from the moisture drawing whatever the pouch touches internally from your hands to the counter top.
- Check indicators after sterilization before storing.
- Store pouches in a cool, dry place. Heat and moisture can compromise the indicator.
- One of the most overlooked concepts with sterilization is cross–contamination.4 The plastic must be completely separate from the paper when tearing the pouch open. The outside of the plastic has been exposed to the environment. If the plastic is adhered to the paper, there is a chance of cross–contamination if the instruments touch the plastic. The plastic may have been exposed to contaminants since it was sterilized.1 Test your pouches before using by simply tearing the plastic from the paper. If the plastic adheres, return the supply to the manufacturer.
- Do not glove up until the pouch is opened; otherwise, the contaminants on the exterior of the pouch may be transferred to your gloves, thereby contaminating the instruments and the entire procedure.
- Do not move the pouch around multiple times before using, and store in a stable place. Repeated movement can compromise the material.
Operator error is at fault in a majority of sterilization failures.2 Understanding products and their parameters of use can mean the difference between putting patients at risk and keeping a safe infection control environment.
References
- Interview with Andy Whitehead, Crosstex August 2009
- Interview with Michael Durda, DUX Dental August 2009
- CDC Guidelines: From Policy to Practice by OSAP, 2003, Annapolis, Md.
- Palenik CJ, Burke FJT, Coulter WA, Cheung SW. Cross–Infection Control, Improving and Monitoring Autoclave Performance in Dental Practice. Brit Dent J. 1990;187:581–84.
- Centers for Disease Control. Guideline for Disinfection and Sterilization in Healthcare Facilities, 2008. Available at: www.cdc.gov/ncidod/dhqp/pdf/guidelines/Disinfection_Nov_2008.pdf. Accessed Nov. 2009
- Ask OSAP www.osap.org A great resource for answering all your infection control questions
- ANSI/AAMI ST60:1996 Sterilization of health care products – chemical indicators – part 1: General requirements. 1996. Arlington, VA.
- Association for the Advancement of Medical Instrumentation. ANSI/AAMI ST79:2006 Comprehensive guide to steam sterilization and sterility assurance in health care facilities. 2006. Arlington, VA: AAMI.
About the Author
Noel Brandon Kelsch, RDHAP, is a syndicated columnist, writer, speaker, and cartoonist. She has received many national awards and owns her dental hygiene practice that focuses on access to care for all. She has devoted much of her 35 years in dentistry to educating people about the devastating effects of methamphetamine and drug use. She is immediate past president of the California Dental Hygienists' Association, on the board of directors for the Simi Valley Free Clinic, and is a five–time winner of the Castroville Artichoke Cook–off. She can be reached at [email protected].


