by Deborah Dopson-Hartley, RDH
Prevention is more than just patient education, oral hygiene instructions, fluorides, and cleaning patients' teeth. In the everyday business of providing dental hygiene services to our patients, an integrated part of my prevention protocol is the use of sealants on both children and adults.
The dentist in our office, Dr. Diane Wright, and I share the same beliefs about conservative and noninvasive — yet aggressive — prevention in dentistry. Our foremost belief is to retain and maintain the integrity of the patient's own natural tooth structure. We know that there is no material better than enamel and it must be conserved.
We also understand that the human body is designed to protect itself. We know through years of research that enamel can remineralize with the consistent and constant use of fluoride, excellent oral hygiene, and improved nutritional choices. I have witnessed this with many of my patients over the course of 26 years as a full-time practicing hygienist.
Until the decay has broken through enamel into the dentin, we do not disturb the enamel on the patients' virgin occlusal surfaces. We recommend the placement of dental sealants first.
Sealants are a proven and preventable method that has helped to keep the enamel intact for years. Every hygienist has seen the old sealant material still somewhat intact in areas of the deep pit and fissures occlusal surfaces on adults placed years ago. And still no decay is found.
I still feel after 20 years that placing sealants is one of the best preventive services offered to patients both young and old alike. Wouldn't you rather try a preventive noninvasive bonded dental sealant placed on the patient's virgin tooth surface first, followed by what I call a sealant restoration or most call a filling?
Fortunately, like many of the dental restorative materials used today, bonded dental sealant materials and the instruments used for their placements have improved as well. In addition, the techniques being taught are extremely sensitive. When placing a permanent restoration for preventive purposes, the protocols for their successful placement are critical — timing is everything. There is simply very little room for error!
My dental sealant of choice is the EcuSeal® system by Zenith/DMG because of its consistent reliability. I prefer this system because of its ease of placement from an advanced delivery system call the Ecu-PEN® as well as the dependable results I get from its superior compomer material. EcuSeal is an aluminofluorosilicate glass that contains zinc and fluoride. With this light-curing pit-and-fissure sealant I rarely replace sealants anymore. The secret to EcuSeal is the controlled expansion of the material; never expanding too much but just enough to ensure exact margins in the pits and fissures.
The Ecu-Pen allows the flow of the resin and/or etching gel to be released in a continuous, accurate, and streamlined motion, flowing exactly where I want it to go by just sliding the index finger on the roller mechanism in the same direction in which the Ecu-PEN is moving. The Ecu-PEN is ergonomically designed because of its natural finger and hand motion, which makes it more comfortable and easy for me to use. In addition, it will withstand up to 100 autoclavings at a temperature of 130 degrees Celsius.
Sealants should be checked periodically. If a sealant is missing and needs to be replaced, repeat total etching and coating process. If a sealant needs to be repaired, additional sealant may be added to the bonded material by abrading the surface of the sealant present and then adding new material.
Contraindications:
Sealing pits and fissures using enamel-etching technique is contraindicated when caries are already present in the enamel, and where it is difficult to maintain a dry environment.
Sealants should not be used on occlusal surfaces where pits and fissures do not exist.
Pit-and-fissure sealants are indicated for use as a caries-preventive restoration on both primary and permanent dentition where there is a potential risk of caries. Buccal and lingual grooves may be treated where independent of gingiva and a dry environment can be maintained.
Technique guide
Here is the step-by-step protocol system I use for placing sealants in our patients' mouths:
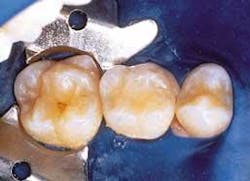
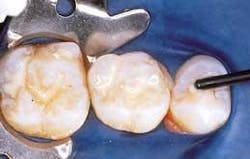
• The use of a rubber dam to isolate 9 (Figure 1) for sterilization purposes, is always recommended. On newly erupting molars in small children and young teenagers, there are times I find the use of a rubber dam just unachievable, but always use one if possible. For best results always maintain a dry surface.
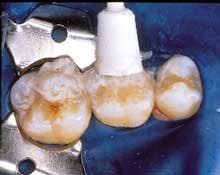
• Clean all surfaces to be sealed by rinsing with an oil-free water spray. Dry or apply a cleaning agent (Figure 2), and then rinse with water spray and dry. Note: Cleaning also may be accomplished with air abrasion.
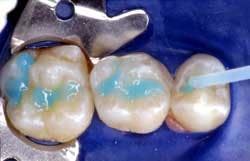
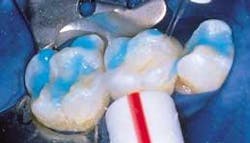
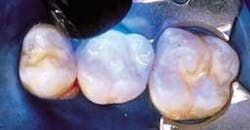
• After the area is isolated, I first prepare the surface by conditioning the site with Ecusit® Etch (Figure 3) for 15 to 30 seconds, covering all surfaces in one continuous motion. The Ecusit etching gel is a water-based, 37 percent phosphoric acid gel. The gel is blue for easy identification against the tooth structure. Then rinse with water spray and dry. The enamel should have a "frosted" appearance (Figure 4).
• Next is the placement of the EcuSeal (Figure 5). I start at the most distal end of the most distal tooth to be sealed in the quadrant, moving the Ecu-PEN in a continuous motion toward the mesial.
• Excess material should be removed with a micro brush before curing.
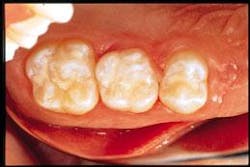
• Light-cure each tooth for 40 seconds (Figure 6). Check for smoothness with a probe or explorer. Note: Surface may be sticky because of an air-inhibited layer. Use ethanol to remove this film.
• Remove rubber dam (Figure 7) and check occlusion, adjusting with a 30-fluted carbide bur or fine diamond followed with either a composite or polishing paste applied with a prophy cup.
Deborah Dopson-Hartley, RDH, has practiced her clinical skills full-time on a daily basis for the last 25 years. Deborah is an executive board member and an instructor for the prestigious The Amara Institute. She is on the board of directors for genR8TNext. She has authored numerous articles for leading publications. For more information, visit her Web site at www.deborahhartley.com or call (813) 985-5516.

